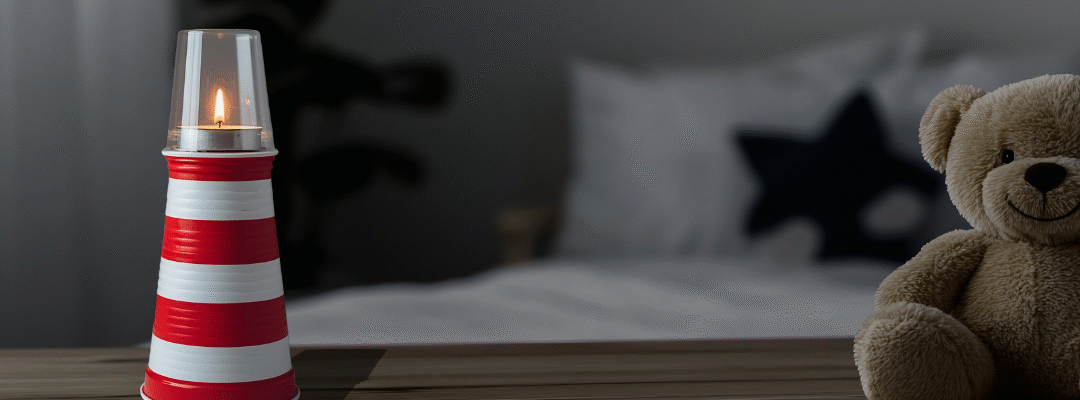
These simple lighthouse lights are made from supplies you likely have on hand, making them perfect for a low-budget, low-stress activity.
Inclusion: Library programming is designed to be fully inclusive. Age limits may be implemented in certain programs to ensure that program content fosters appropriate developmental markers.
If you know you will have kids from other countries participating, research beforehand the lighthouses located there so you can share fun facts about them.
Accessibility: To help participants with hand strength/mobility functions, put glue (if using) on a plate and provide a paintbrush to apply it. Provide loop scissors and grips for paintbrushes (if using).
Mode: In Person
Staff Energy: Low
Ages: 5-12
Cost: Low
Length: 45 min.
Ideal Attendance: 15
STEAM Practices:
✓ Art
Tags: kids, craft, low cost, low energy, decor
Credit: Kate Davis
Supplies:
(Commonly on-hand supplies are not included in cost breakdown.)
Large Solo-type cups (don’t have to be red) $2.99/36ct 8cents each
Smaller clear plastic cup ($9.88/100) 10 cents each
Battery-operated tea light candle (with batteries) ($3.49/12) 29 cents each
Solid colored washi or electrical tape $7.99/100ft) 7 cents/foot
Scissors
Black construction paper
Solid colored washi tape
Optional: Glue
Optional: Paper plates
Optional: Blue construction paper
Optional: Blue, grey, clear flat floral marbles $1.25/36 marbles
Total Cost: ~ $0.75/per participant (if they do one lighthouse each)
Instructions:
Show the kids an example and let them know that the top of the Solo cup will be the bottom for this craft.
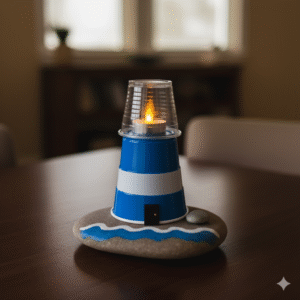
Choose a color of tape, then wrap it around the Solo cup. You can wrap it with thicker lines and alternate spacing for a more unique design. These are called daymarks. They were used to tell lighthouses apart. Lost ships could tell where they were based on what a lighthouse looked like.
Cut out a door and windows (called glazings on lighthouses) from black construction paper. Glue them where you wish.
Place the tealight (a lighthouse’s light is called an optic) on the top of the lighthouse and cover it with the clear cup (a lantern, in lighthouse lingo). Warn the kids not to push the clear cup down too hard over the Solo cup. They want to easily remove the clear cup so they can turn their light on and off easily.
Optional: Glue blue construction paper to a paper plate, then line the edges of the plate with flat marbles to give the illusion of waves. Secure the lighthouse in the middle of the plate with some glue.
Staff Know-How
Planning, Set Up & Facilitation
1. Make a sample.
2. Gather a selection of washi tapes and options for making a base.
3. Make sure all the tealights work.
Pro-Tips
- Make sure your clear cups are big enough to slide over the lighthouse base while still leaving space for the lantern (tea light).
- While kids are creating, ask them to imagine the ships your lighthouse will guide. Where are they going? Who is on them? What are they carrying?
- Play a water soundtrack in the background.
- If you have any lighthouses in your area, can you partner with them to arrange for free tickets for your kids?
- Fun facts:
- The first American lighthouse to use electricity was the Statue of Liberty in 1886.
- The first lighthouse, the Pharos of Alexandria in ancient Egypt, was built in the 3rd century BC.
Marketing & Promo
Book Suggestions
Resources are availabe in the SHARE catalog as of May 2025.
Hello Lighthouse (Blackall, Sophie)
The lighthouse family. The octopus (Rylant, Cynthia)
Death at the Lighthouse (Beckett-King, Alasdair)
The puffin keeper (Morpurgo, Michael)
The lighthouse mystery (Warner, Gertrude Chandler)
The lighthouse between the worlds (Crowder, Melanie)
Between the lighthouse and you (Lee, Michelle (Michelle S.)
Kate’s Light : Kate Walker at Robbins Reef Lighthouse (Spires, Elizabeth)
Of salt and shore (Schaap, Annet)
Reusability
Too many options to list!